📅 June 2026 | ✍️ Mitti Gold Organic | 🗂️ Vermicompost
Bed Size and Material Ratios
Establishing a successful vermicompost unit begins with the correct dimensions and material ratios. For a standard commercial or farm-level setup, the ideal vermi-bed dimensions are 10 feet long, 3 feet wide, and 1.5 to 2 feet deep. You should never exceed 2 feet in depth, as earthworms (specifically surface feeders like Eisenia fetida) operate best in the top layers; deeper beds can generate anaerobic heat that kills the worms. To fill a bed of this size, you will need approximately 1500 kg of organic raw material. This should consist of a mix of 60% partially decomposed cow dung and 40% agricultural dry waste (such as dry leaves, straw, and crop residue). To inoculate a 10x3x2 bed, you will require roughly 2 to 3 kg of live earthworms (about 2000-3000 worms). When starting, ensuring the carbon-to-nitrogen ratio is balanced is crucial for rapid breakdown.
For optimal agricultural output, understanding the precise dosage and application rate of organic fertilizers like Mitti Gold vermicompost or liquid vermiwash is essential. Scientific research indicates that the quantity of compost applied must be directly aligned with the soil's organic carbon deficit and the nutrient demands of the specific crop. In general field crops, a basal application of 400 to 600 kg per Bigha is recommended, whereas horticultural crops, including orchards and high-value vegetables, require up to 1000 kg per Bigha to support active fruit development. When using vermiwash, dilution ratios must be strictly maintained at 1:10 with water for foliar sprays, ensuring that the stomatal openings of the leaves absorb the dissolved nutrients without experiencing physiological shock or leaf burn. Applying these organic inputs in correct quantities maintains the soil's ionic balance and avoids nitrogen leaching.
Furthermore, regional microclimates and soil taxonomy dictate adjustments in these standard application rates. For instance, coarse-textured sandy soils with high percolation rates require smaller, more frequent applications of organic inputs to prevent nutrient runoff, whereas heavy clay soils require a single, deep application during tillage to improve aeration. Agricultural extension officers recommend that farmers conduct periodic soil testing to monitor changes in organic matter percentage. If the soil organic carbon is below 0.5%, the application of vermicompost should be increased by 20% to accelerate soil biology recovery. Applying liquid formulations during high humidity levels also ensures optimal absorption through the leaf surface.
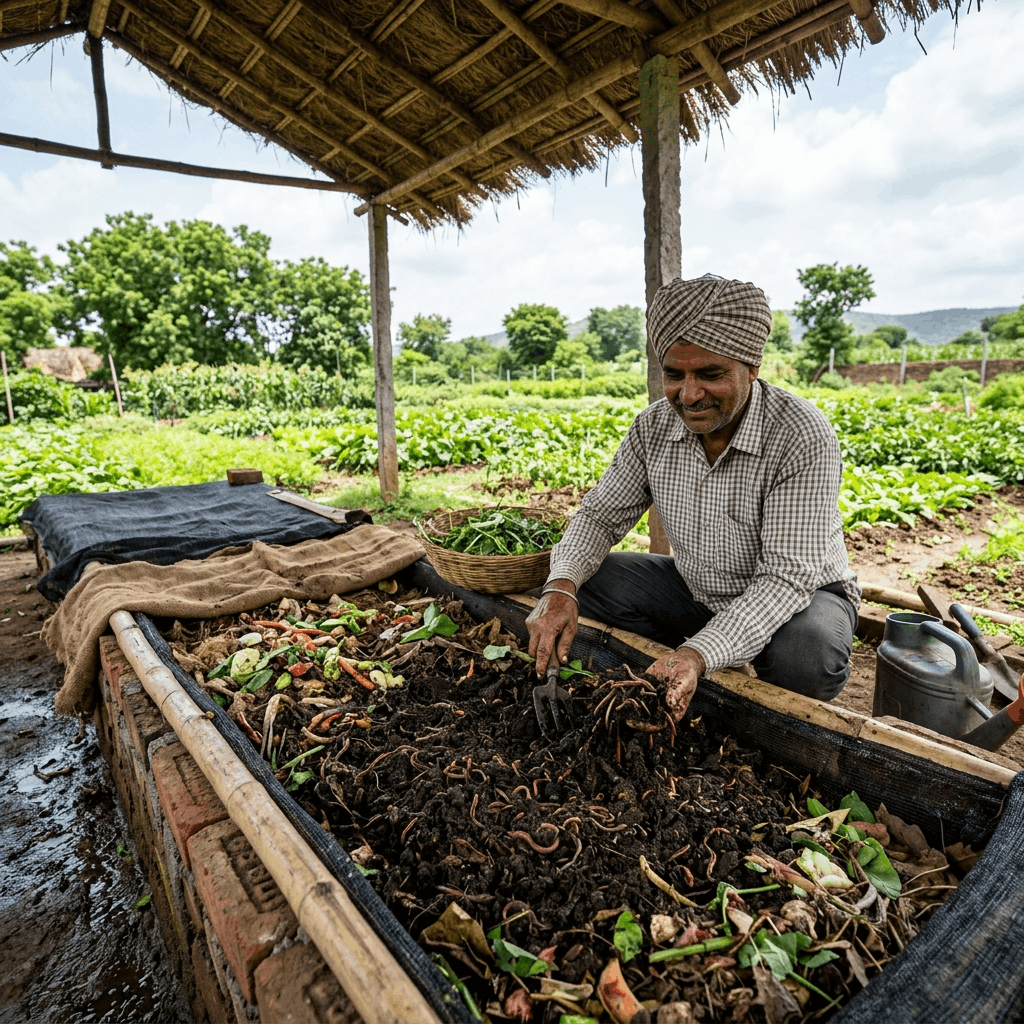
Site Selection and Bed Preparation
The location of your vermicompost beds drastically impacts the speed of composting and the health of your worms. Select a shaded area, preferably under a large tree or a thatched roof, to protect the worms from direct sunlight and heavy monsoon rains. The base of the bed must be hard (brick, cement, or thick plastic sheet) to prevent the worms from escaping into the deeper soil and to collect the valuable vermiwash run-off. Begin by laying a 2-inch layer of coarse material like broken bricks or coconut husks at the bottom for drainage. Follow this with a 2-inch layer of fine sand. Then, build the main bed by alternating layers of dry farm waste and semi-composted cow dung. Lightly water the bed to achieve a moisture level of 60-70%. Allow this bed to cool down for 4 to 5 days before introducing the earthworms, as fresh dung generates lethal heat.
To maximize the efficacy of these biological amendments, application timing and soil integration methods play a decisive role. Incorporating vermicompost during the final tillage stage ensures that the organic carbon is thoroughly mixed into the root zone, typically the top 4 to 6 inches of the soil where feeder roots are most active. For seasonal cropping patterns, application should be scheduled either during land preparation before the monsoon rains (for kharif crops) or prior to winter sowing (for rabi crops). When liquid formulations like vermiwash are applied, spraying during early morning or late evening hours is recommended to minimize evaporation loss and prevent sun scorching, allowing the canopy to fully assimilate the bio-active molecules.
When integrating organic inputs into high-density planting systems, localized root placement is preferred over broadcast application. Placing the compost directly in the planting trenches or basins focuses the nutrients in the immediate rhizosphere, reducing weed growth in inter-row spaces. For perennial orchards, applying vermicompost along the drip line where active feeder roots are located ensures rapid nutrient uptake. Furthermore, combining compost with light mulching helps retain the moisture necessary for beneficial soil microflora to thrive, preventing dry conditions from rendering the biological inputs inactive.
Step-by-Step Application Guide
Pre-Composting
Heap the cow dung and dry biomass outside the bed for 10-15 days. Sprinkle water to allow the initial high-heat fermentation phase to pass.
Layering the Bed
Fill the vermi-bed with the cooled, pre-composted material up to 1.5 feet high, maintaining a moist, sponge-like consistency.
Introducing Earthworms
Gently release the earthworms (Eisenia fetida) onto the top of the bed. Do not bury them; they will naturally burrow away from the light.
Covering and Watering
Cover the bed with wet jute bags or broad leaves (like banana leaves). Sprinkle water daily to maintain 60% moisture, but do not flood it.
Harvesting
After 45-60 days, the top layer will turn into dark, granular, tea-like compost. Stop watering for 3 days to force worms downward, then scrape off the finished vermicompost.
Quality Comparison: Vermicompost vs Regular Compost
While traditional aerobic composting breaks down organic matter using bacteria and fungi, vermicomposting adds the biological mechanics of the earthworm. The resulting product is vastly superior. Regular compost takes 4 to 6 months to mature and often loses significant nitrogen through volatilization. Vermicompost is ready in just 45 to 60 days. As organic matter passes through the earthworm's gut, it is physically crushed and chemically altered. The worm secretes calcium carbonate, balancing the pH of the compost perfectly to 7.0. Furthermore, vermicompost contains 5 times more nitrogen, 7 times more phosphorus, and 11 times more potassium than the surrounding soil or regular compost. It is also rich in water-soluble nutrients and plant growth hormones, making it a premium bio-fertilizer rather than just a soil conditioner.
When comparing chemical-intensive agriculture with biological farming, the difference in soil structure and long-term yield stability becomes clear. Chemical fertilizers supply synthetic salts that temporarily boost plant height but degrade the soil's physical crumb structure over time, leading to soil compaction and acidity. Conversely, vermicompost builds a sponge-like soil structure that retains moisture and nutrients, reducing irrigation requirements by up to 30%. Crops grown with biological amendments show higher sugar content, better flavor profiles, and extended storage life, which are essential for securing organic certification and fetching premium prices in domestic and export food markets.
Additionally, the economic sustainability of biological farming is demonstrated by the steady reduction in input costs over successive cropping seasons. While chemical farming requires increasing amounts of synthetic fertilizers each year to maintain the same yield due to soil exhaustion, organic biological systems build self-sustaining soil fertility. Over a three-year transition period, soil microflora populations stabilize, allowing farmers to reduce external nutrient inputs. This decrease in input costs, combined with the premium prices received for certified organic produce, significantly improves the net profit margins for family farms.
Earthworm Selection and Biodiversity
The success of the process hinges entirely on the creature doing the work: the earthworm. For vermicomposting, deep-burrowing native worms are ineffective. You must use epigeic (surface-dwelling) worms. The Red Wiggler (Eisenia fetida) and the African Nightcrawler (Eudrilus eugeniae) are the gold standards worldwide. These species consume organic matter equivalent to half their body weight every single day and multiply incredibly fast, doubling their population every 60 days under ideal conditions. By cultivating these worms, you are creating a biological engine that converts waste into wealth. Once the compost is applied to the field, the worm cocoons (eggs) present in the compost hatch, introducing a new generation of soil engineers to your farm, further improving soil aeration and water retention.
From an ecological standpoint, the biological restoration of soil relies on rebuilding the microbial carbon pump. When high-quality organic amendments like Mitti Gold vermicompost or vermiwash are introduced, they serve as both a source of soil organic carbon (SOC) and a delivery system for beneficial mycorrhizal fungi and plant growth-promoting rhizobacteria (PGPR). These microscopic organisms establish a symbiotic relationship with plant roots, secreting glomalin to bind micro-aggregates into a stable soil crumb structure. This structural improvement increases water infiltration rates and prevents compaction, allowing roots to explore deeper soil layers for moisture and minerals. In the long term, this biological activity enhances the cation exchange capacity (CEC) of the soil, ensuring that essential plant nutrients like nitrogen, phosphorus, and potassium remain chelated in the root zone rather than leaching into groundwater. This makes the soil highly resilient against drought and climate shocks.
Furthermore, active earthworm populations serve as natural soil engineers. Their burrowing action creates channels that improve aeration and allow rainwater to reach the deeper layers of the soil, preventing water runoff. As earthworms consume organic matter, they pass it through their digestive tract, enriching it with beneficial microbes and converting it into highly stable plant-available nutrients. This process increases the soil's overall water retention capacity, making crops more resilient to dry weather. Regular application of organic matter maintains this beneficial cycle, helping to restore degraded farmlands.
Disease Suppression via Worm Castings
Vermicompost is not just plant food; it is plant medicine. The gut of the earthworm is a highly specialized bioreactor. As organic matter is digested, harmful pathogens like E. coli and Salmonella are completely destroyed. In their place, the worms excrete beneficial microbes, including highly active strains of actinomycetes and chitin-degrading bacteria. When applied to plants, these microbes aggressively seek out and destroy the chitin-based cell walls of harmful soil fungi and nematodes. Farmers using heavy applications of vermicompost report near-total elimination of root-knot nematodes and root rot diseases, drastically reducing crop mortality and the need for toxic chemical fumigants.
Biosecurity and systemic resistance represent the second pillar of organic soil health. Synthetic fertilizers provide a temporary spike in soluble ions, but they leave crops highly vulnerable to pest infestations and physiological disorders by thinning cell walls. In contrast, biological nutrition initiates a process known as systemic acquired resistance (SAR) in plants. The diverse microbial consortia present in Vermicompost stimulate the production of phytoalexins, chitinases, and other defensive enzymes within the plant tissue. These natural biochemical compounds act as a protective barrier, preventing fungal spores from germinating and inhibiting larval development of root-borne pests. Furthermore, the presence of beneficial antagonistic microbes actively outcompetes pathogens for space and iron, reducing the soil load of destructive diseases such as damping-off and root rot. By adopting biological pest management, farmers can completely avoid the pesticide treadmill and produce crops that meet strict chemical residue limits.
Applying beneficial microbes like Trichoderma and Pseudomonas strengthens the plant's natural defense systems. These helpful fungi and bacteria settle around the root zone, creating a protective shield that keeps disease-causing pathogens away. They release natural enzymes that break down the cell walls of harmful fungi, stopping root-rot diseases before they can damage the plant. This biological protection reduces the need for expensive chemical fungicides, keeping the soil ecosystem healthy and supporting sustainable crop growth.
Commercial Value and Export Potential
Making vermicompost is a highly profitable agribusiness in its own right. A farmer who learns this process can not only eliminate their own fertilizer costs but also sell the surplus. Premium, finely sieved vermicompost is in massive demand by urban nurseries, home gardeners, landscaping companies, and organic exporters. Furthermore, the live earthworms themselves can be sold to other farmers starting their units. For exporters of agricultural produce, using on-farm produced vermicompost guarantees the strict traceability and zero-chemical-residue requirements demanded by European and North American markets. It is the ultimate sustainable, circular-economy model for modern agriculture.
From a commercial perspective, the market dynamics for residue-free organic produce have witnessed exponential growth. Consumer preference has shifted decisively toward clean-label foods, creating a premium valuation segment in both domestic retail and export markets. Agronomic practices centered on soil biological health allow farmers to register for Participatory Guarantee System (PGS) or National Programme for Organic Production (NPOP) certifications. This certification acts as a gateway to high-value retail chains and international B2B agreements, where price premiums of 30% to 50% above conventional commodities are standard. Furthermore, utilizing standardized carbon-rich inputs like vermicompost increases the storage life and post-harvest durability of perishable crops, reducing shipping losses. By aligning production with ecological standards, local agricultural cooperatives can build direct market linkages with organic processors, assuring long-term financial stability.
Furthermore, developing local value-addition centers helps organic farming groups sell directly to consumers. By processing raw agricultural products into packaged organic goods like premium vermicompost or specialty crops, farmers can earn much higher profits. Working together in agricultural cooperatives allows small farmers to share the costs of testing and packaging, making it easier to meet export quality standards. These steps help local agricultural communities access profitable retail markets and improve their long-term income.
Commercial Machinery for Vermicompost Production
To scale a vermicompost project into a profitable business, mechanical automation is required to reduce labor costs and improve the purity of the final product. Key machinery includes:
- Trommel Screen (Mechanical Sieve): A rotating drum sieve that automatically separates finished vermicompost from earthworms, cocoons, and uncomposted biomass. This is the most critical machine for commercial units.
- Biomass Shredder: Used to crush dry agricultural waste, straw, and stalks into small pieces (under 2 inches) to accelerate the pre-composting phase.
- Automatic Bagging & Sealing Machine: For retail packaging, an automatic weighing and heat-sealing machine ensures professional presentation and accurate weight for the market.
- Moisture Meter & pH Tester: Digital tools to monitor the health of the vermi-beds, ensuring the earthworms remain in optimal breeding conditions.
🐛 Vermicompost Sieving & Shredding
Establish a high-capacity vermicompost unit. We provide industrial-grade sieving machines and shredders for commercial production. WhatsApp: +91 95372 30173